Punky's New Brew - Part 1
Punky’s New Brew
In the world of electronics and music, true innovation often arises from the art of combining and modifying existing ideas. It’s about taking the tried and tested and infusing it with fresh creativity. So today, we’re not reinventing the wheel; we’re celebrating the beauty of innovation through adaptation. Join me on this journey of making music by reimagining what’s already known.
Along the way, we’ll build a few circuits: the Atari Punk Console, an attack/decay envelope, and a basic VCA. While we won’t dive too deep, we’ll get enough to stay afloat and ride the waves by giving Punky a new brew.
The Atari Punk Console
For this experiment, we’ll explore the astable mode of the 555 timer to build an oldie but goody – the “Atari Punk Console” (APC). This simple and classic DIY electronic sound generator circuit is beloved in the world of electronic music and circuit bending. Originally created in the 1980s, it’s a way to produce unique and quirky sounds using basic components.
- Sound Generation: The APC is known for creating distinctive square wave audio tones, often described as producing “lo-fi” or “8-bit” sounds reminiscent of early video game consoles.
- Basic Components: The circuit typically consists of two 555 timer ICs, making it an excellent choice for beginners in electronics. We’ll be using the 556 IC, which contains two 555 timers in a single package.
- Controls: The APC typically has two potentiometers (variable resistors) for adjusting the frequency and pitch, producing a wide range of audio effects.
- Experimental Nature: Musicians and electronic enthusiasts use it for creating unusual and unpredictable sounds, perfect for noise music, circuit bending, and creative sonic exploration.
- Educational Tool: The APC is often used in educational settings to teach basic electronics principles.
555 Timer
The 555 timer is a classic integrated circuit (IC) that’s super handy for various electronic projects, including music-related ones.
Here’s the lowdown on the 555 timer:
- The 555 timer is a versatile IC used in electronics for various applications.
- It operates in different modes, including astable (for oscillations), monostable (for one-shot pulses), and bistable (as a flip-flop).
- In music projects, the 555 timer can create clock signals, rhythmic patterns, and trigger events.
- It’s known for its simplicity and availability, making it a go-to choice for DIY electronics enthusiasts.
To make it work, we’ll need some passive components like resistors and capacitors. These components determine the timing characteristics of the 555 timer.
The 555 timer’s simplicity and versatility make it great for quick prototyping and tinkering. You can use it to trigger drum sounds, control LEDs, or create simple sequencers for your music projects.
Operational Amplifier
An operational amplifier, or op-amp, is an electronic component that amplifies the voltage difference between its two input terminals. It has high input impedance, meaning it doesn’t draw much current from the input source, and low output impedance, allowing it to drive low-impedance loads.
Operational amplifiers are versatile components. Today, we’ll focus on the most common configuration: the buffer. A buffer is a configuration where the output voltage follows the input voltage without amplification (gain of 1). It’s like an electronic isolator or a unity gain amplifier, useful for impedance matching, isolating circuit components, and preventing loading effects.
We’ll use these buffers to control the charge and discharge of a capacitor in a simple yet capable Attack Decay envelope generator.
Envelope Generator
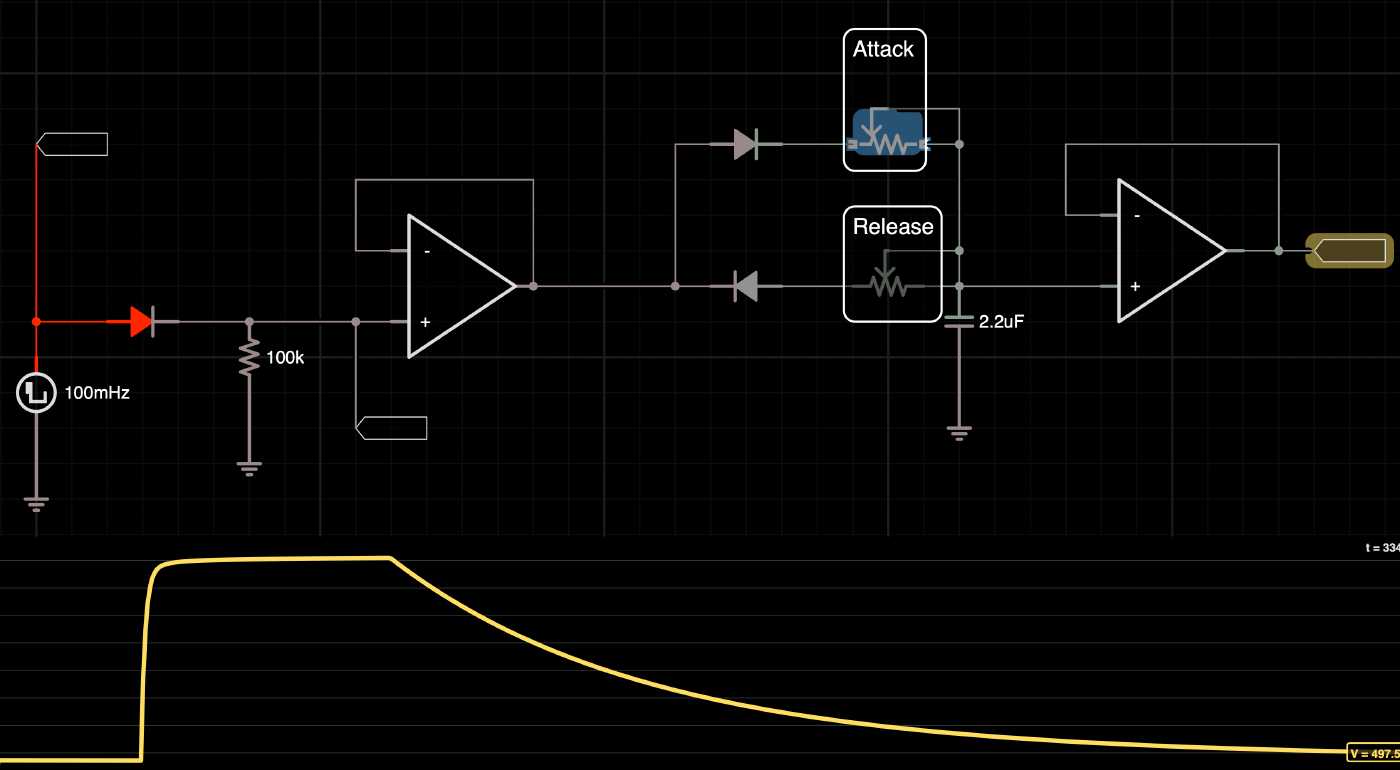
Envelope generators are essential tools in electronic music and sound synthesis. They shape the amplitude or volume of a sound over time, adding dynamics and expression to music. Envelope generators typically have four main stages:
- Attack: Gradual volume increase, simulating how an instrument note is initiated.
- Decay: Volume decrease after reaching its peak, mimicking the natural decay of a musical note.
- Sustain: Holding the sound at a constant volume as long as the note is held.
- Release: Graceful sound fade-out when the note is released.
Envelopes are crucial for sculpting musical notes, creating percussive attacks, sustaining pads, and expressive swells. They’re used in synthesizers, drum machines, and effects processors to add depth and character to electronic music.
We have designed an Attack/Release envelope generator suitable for shaping various sounds.
We’ll use this signal to control the flow at the output of the APC, but to do so, we’ll need to create a voltage-controlled amplifier (VCA).
The Vactrol
Vactrols are unique electronic components that combine a light-sensitive resistor (LDR) and a light-emitting diode (LED) in a single package. They’re often used in music and audio applications for their ability to convert changes in light intensity into changes in resistance.
Key points about Vactrols:
- Vactrols combine an LDR and an LED in one package.
- They change resistance based on the intensity of light they receive.
- Used in music and audio gear for voltage-controlled effects like amplification and filtering.
- Add unique, organic, and often “vintage” characteristics to sound.
- Have adjustable response times for creative control.
- Come in various types for different applications.
- Customizable and popular in DIY electronics for sound manipulation.
Today, we’ll make our own Vactrols using an LED, an LDR, and some heat shrink tubing.
Vactrol VCA
During our VCA exploration, we encountered various circuit designs, from complex but accurate to simple with some flaws. One of them was a VCA composed of only two components: a diode and a transistor. Since our aim isn’t precision but rather weird sound generation, drawbacks like distortion might be desirable. After evaluating different options, we settled on two VCA designs: a Vactrol-based VCA and a two-component transistor VCA.
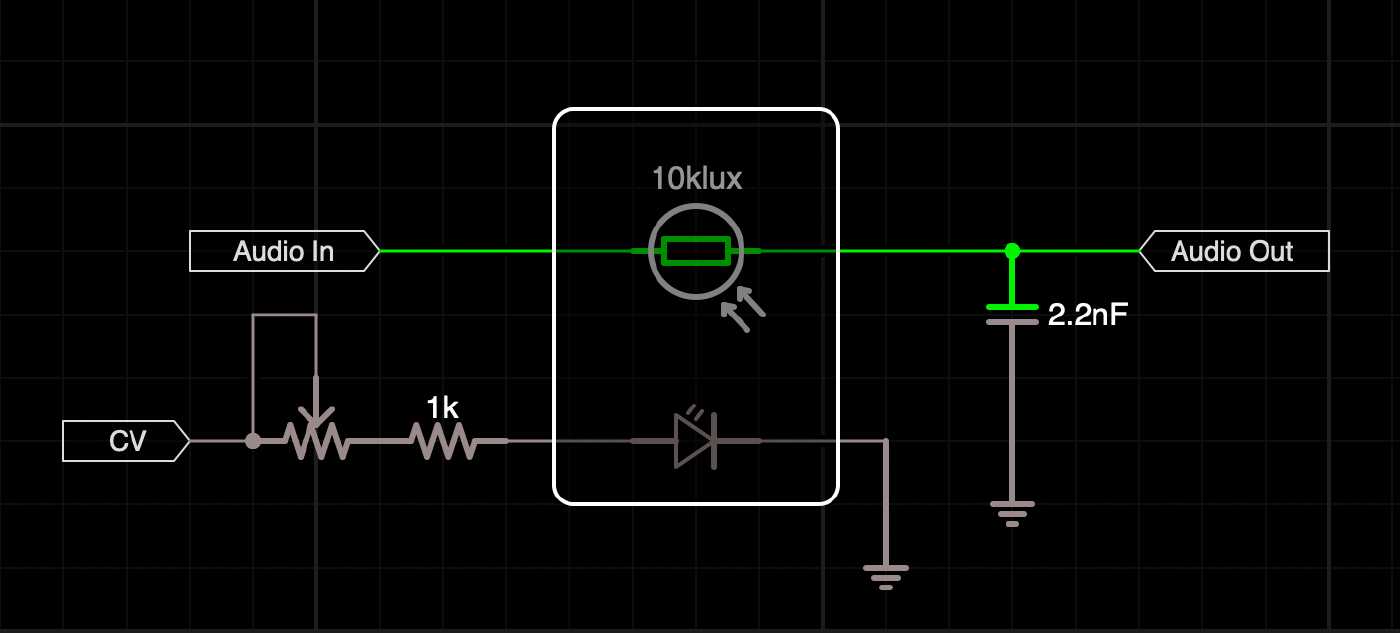
While the transistor approach provides distortion, achieving linearity required reducing the CV signal to the extent that the output signal was only about 1.7V peak to peak. This necessitated further amplification to match eurorack levels, ranging from 5V to 10V peak to peak. So, we opted for the Vactrol approach, where the signal is closer to 4V peak to peak, eliminating the need for additional amplification. However, Vactrols are known for their slowness, which initially raised concerns.
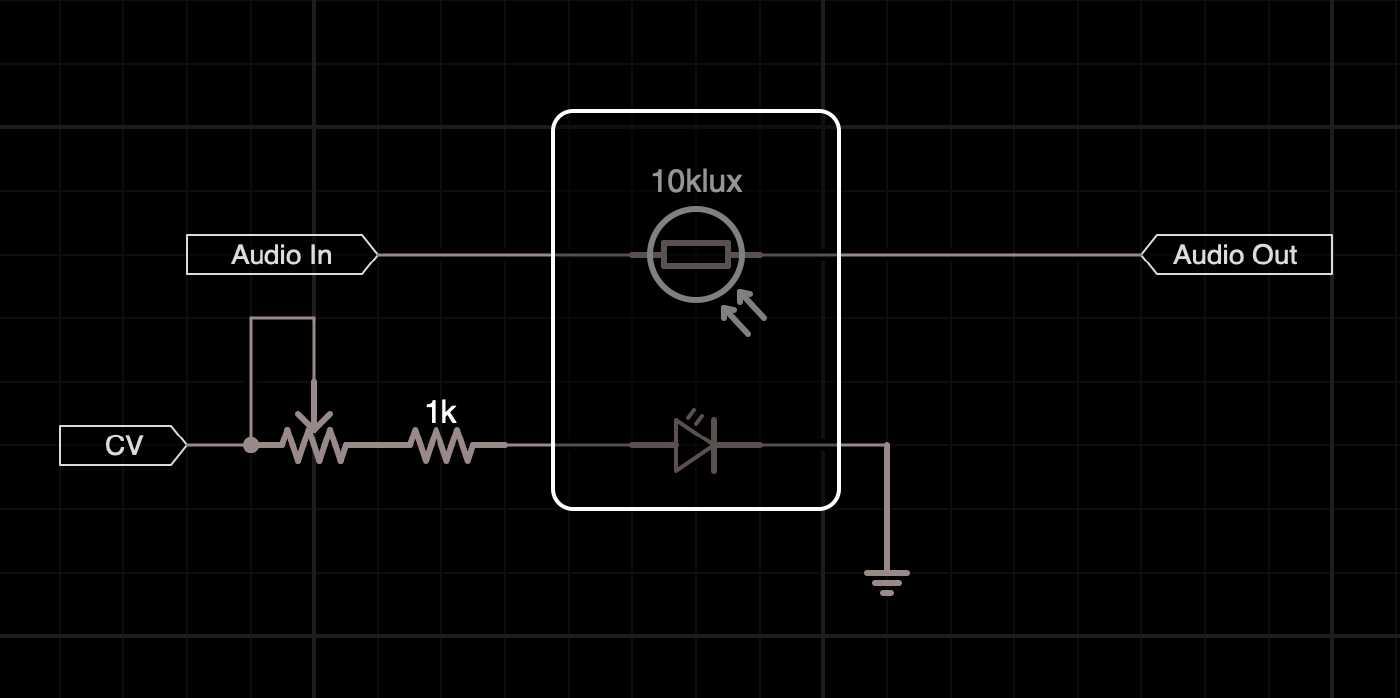
In our VCA research, we came across a modification by Benjie Jiao. This modification added a capacitor to ground, creating a low-pass gate that’s more responsive and versatile.
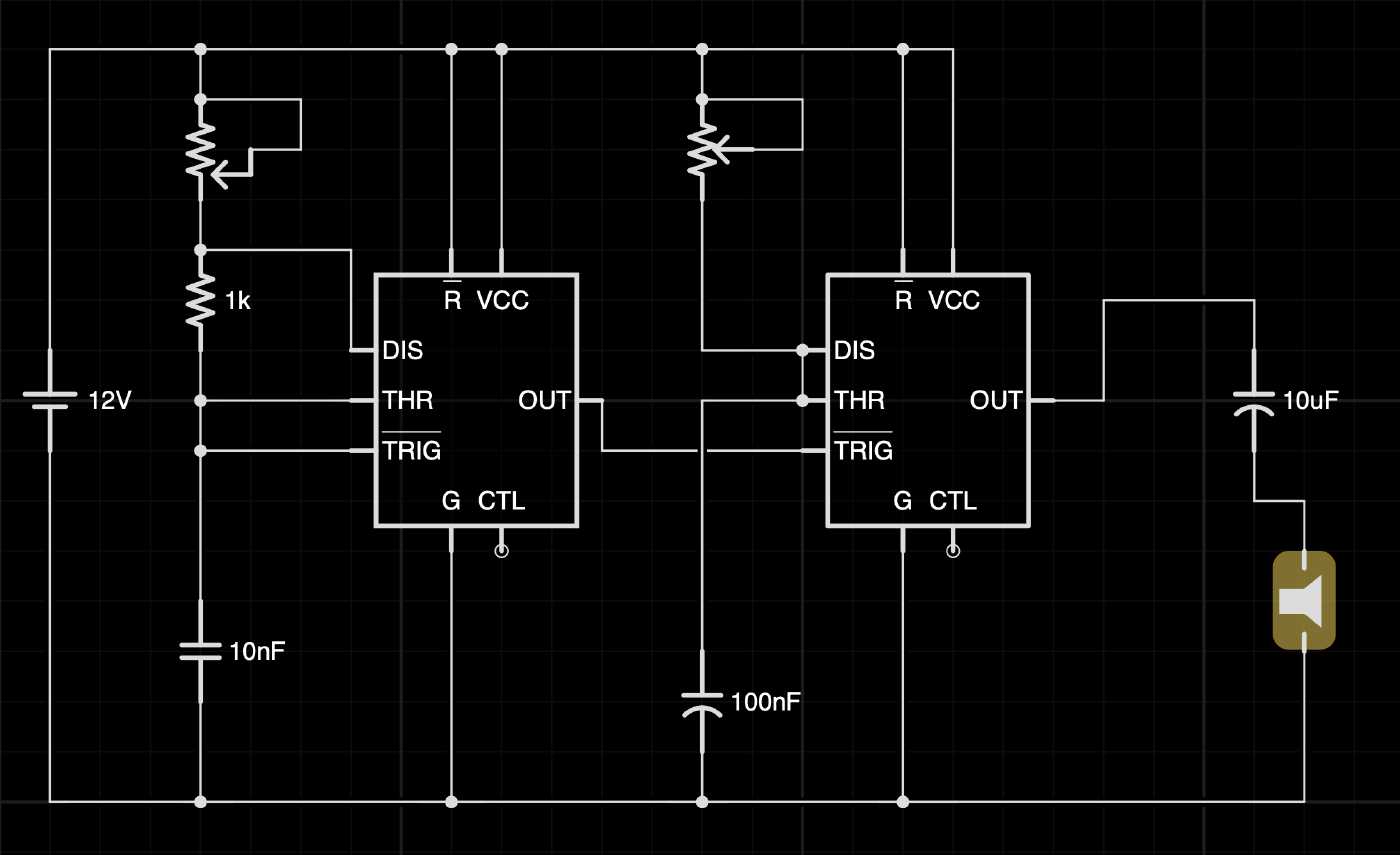
Enter Punky’s New Brew
Now that we’ve explored the necessary pieces for our circuit, let’s take a look at what we’re building.
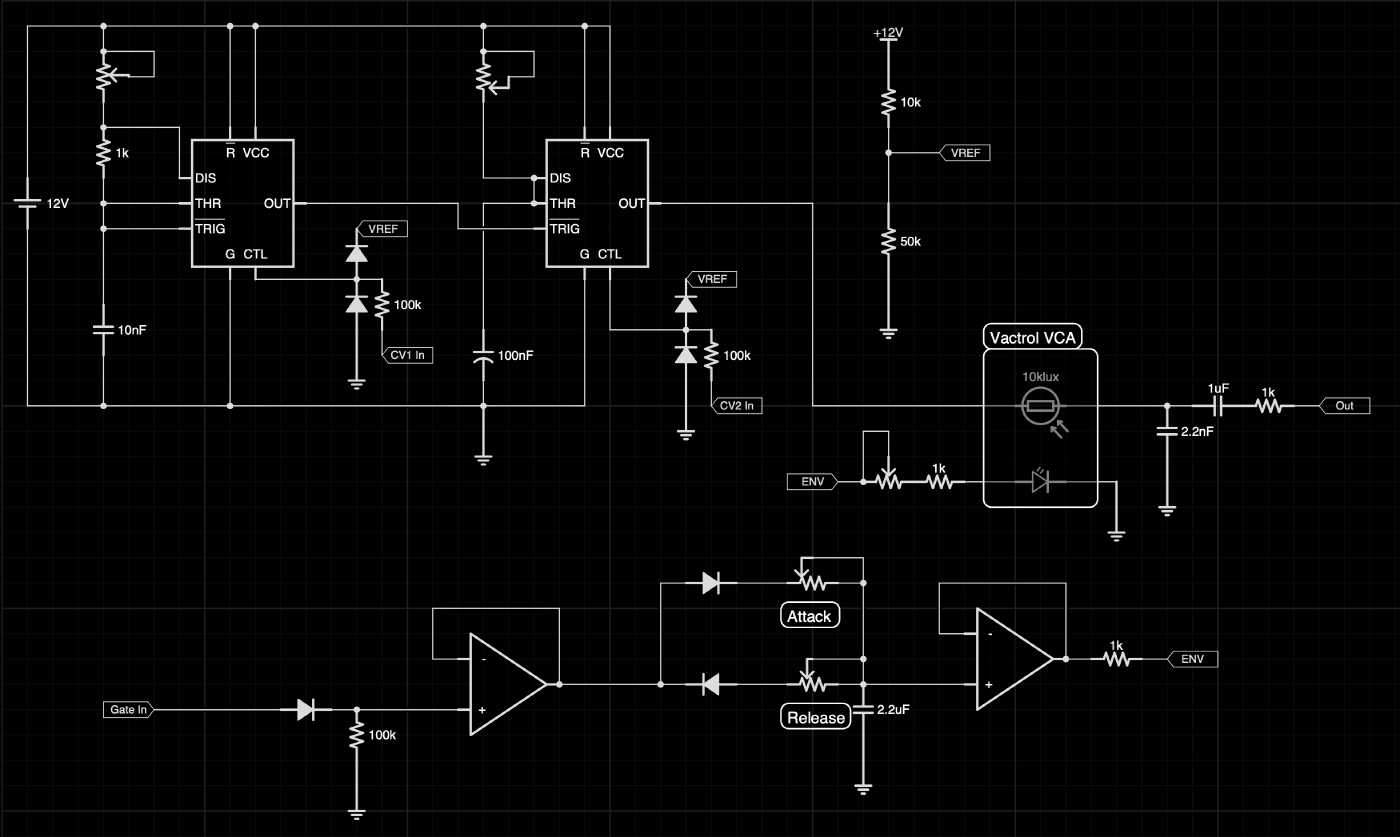
On the image above, you can see the schematic. Adjusting the knobs for the APC frequencies alters the sound. We can also control them externally by sending control voltages, provided they stay within the IC’s limits. Clamping diodes have been included in the schematic to ensure this.
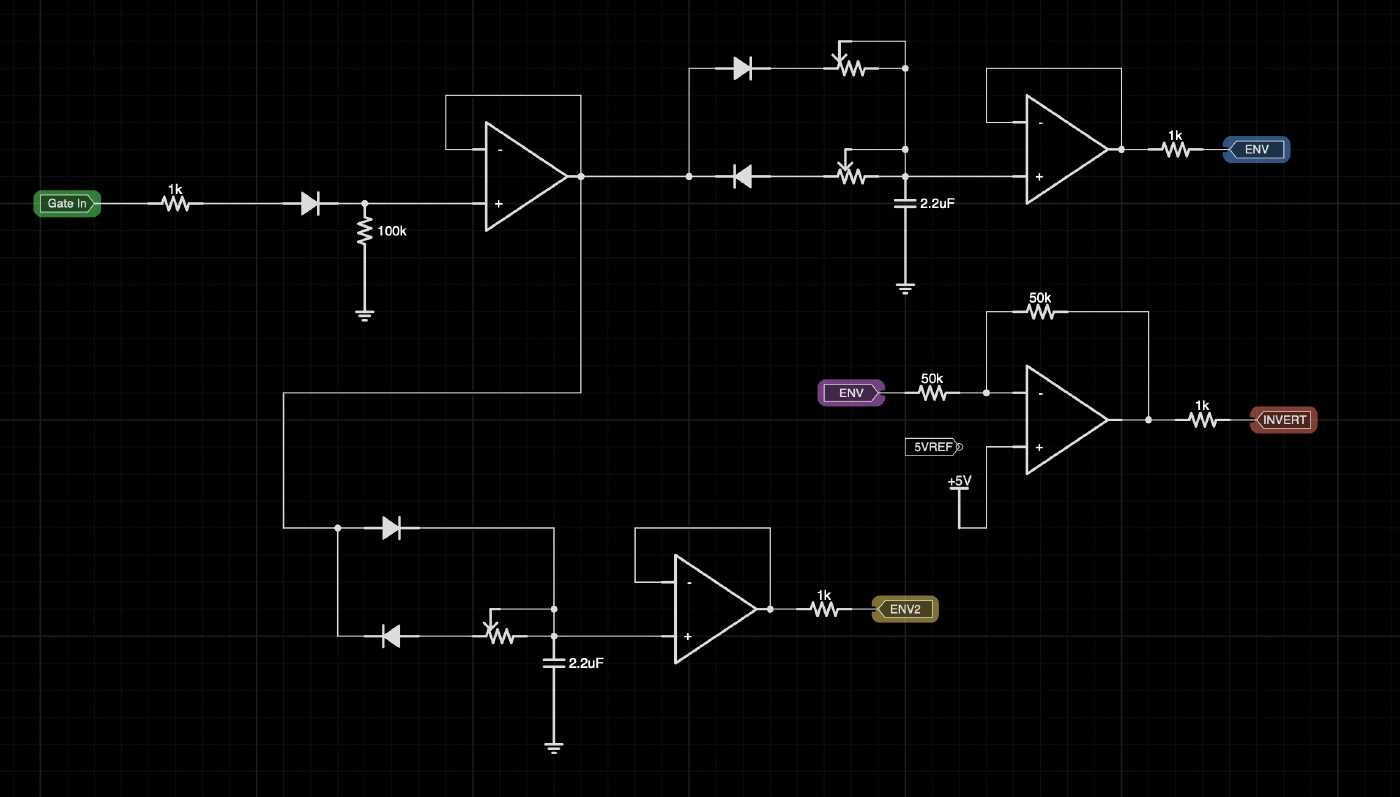
We’ve built the traditional APC, but ours includes a built-in shaper. This allows us to create a variety of sounds, from slow ambience to sharp, drum-like tones. We can add an envelope output, which, being buffered, can be used with other modules or routed to the CV inputs for the two 555 timers. Another mod could involve using a 4 op-amp package instead of a dual one like the TL074, opening up more sound manipulation possibilities, like the image bellow.
Up Next…
Today, we dipped our toes into the world of the astable 555 timer, the op-amp buffer, and Vactrols. These components have given an old Punk a fresh brew of sounds, resonating with ’80s nostalgia. Next, we’ll take this design and create a professional circuit board and faceplate using KiCAD.
I hope you’ve enjoyed this journey of exploration. If you’ve been following along, consider sharing videos of your musical creations with us. Stay creative and find new ways to enhance those old circuits!
If you enjoyed this post and video, please hit the like button. And if you want to see more, be sure to subscribe to my YouTube channel. I regularly post content covering a wide range of topics related to music, electronics, and audio creation.
Helpful Resources
- APC Original Schematic
- Using the 555 Timer
- Envelope Follower/Attack Release Envelope Generator
- Envelope Circuits: a simple AR design using op-amps
- Electric Druid - Eurorack Linear Vintage LM13700 VCA
- VCA Techniques Investigated
- Simple VCA (using a single LM13700)
- Skull & Circuits: Classics VCA-1
- Single Transistor (Passive) VCA
- Vactrol VCA
- Vactrol Low Pass Gate
- How to make Vactrols
- Where I get my LDRs