Introduction to MIDI with Arduino
Today’s video covers an essential topic we haven’t addressed yet: MIDI with microcontrollers. We’ll explore a high-level overview of MIDI, how to wire up circuits for MIDI input and output, and configuring the Arduino MIDI.h library for use with an STM32 BluePill microcontroller. Let’s dive in!
2. What is MIDI?
MIDI, or Musical Instrument Digital Interface, is a technical standard that facilitates communication between electronic musical instruments, computers, and other devices. Introduced in 1983, MIDI standardized communication protocols, allowing devices to transmit and receive musical performance data. Prior to MIDI, proprietary systems limited interoperability, hindering collaboration between manufacturers. MIDI revolutionized electronic music production by enabling seamless control, synchronization, and performance across multiple instruments and equipment.
Integrating MIDI into Eurorack modular synthesizers expands creative possibilities by bridging digital and analog worlds. MIDI allows Eurorack modules to communicate with keyboards, sequencers, and computers, expanding operability and enhancing workflow efficiency.
3. Hardware Setup

MIDI utilizes a 5-pin DIN connection, with pins 4 and 5 used for communication. Alternatively, 3.5mm jacks have gained popularity for their smaller size and compatibility with compact devices like drum machines and synths. However, multiple standards exist for 3.5mm cables, leading to compatibility challenges. BTW, in 2018 the TRS-A MIDI type became part of the MIDI standard! Hmmm, wonder what will happen to those who no longer comply…
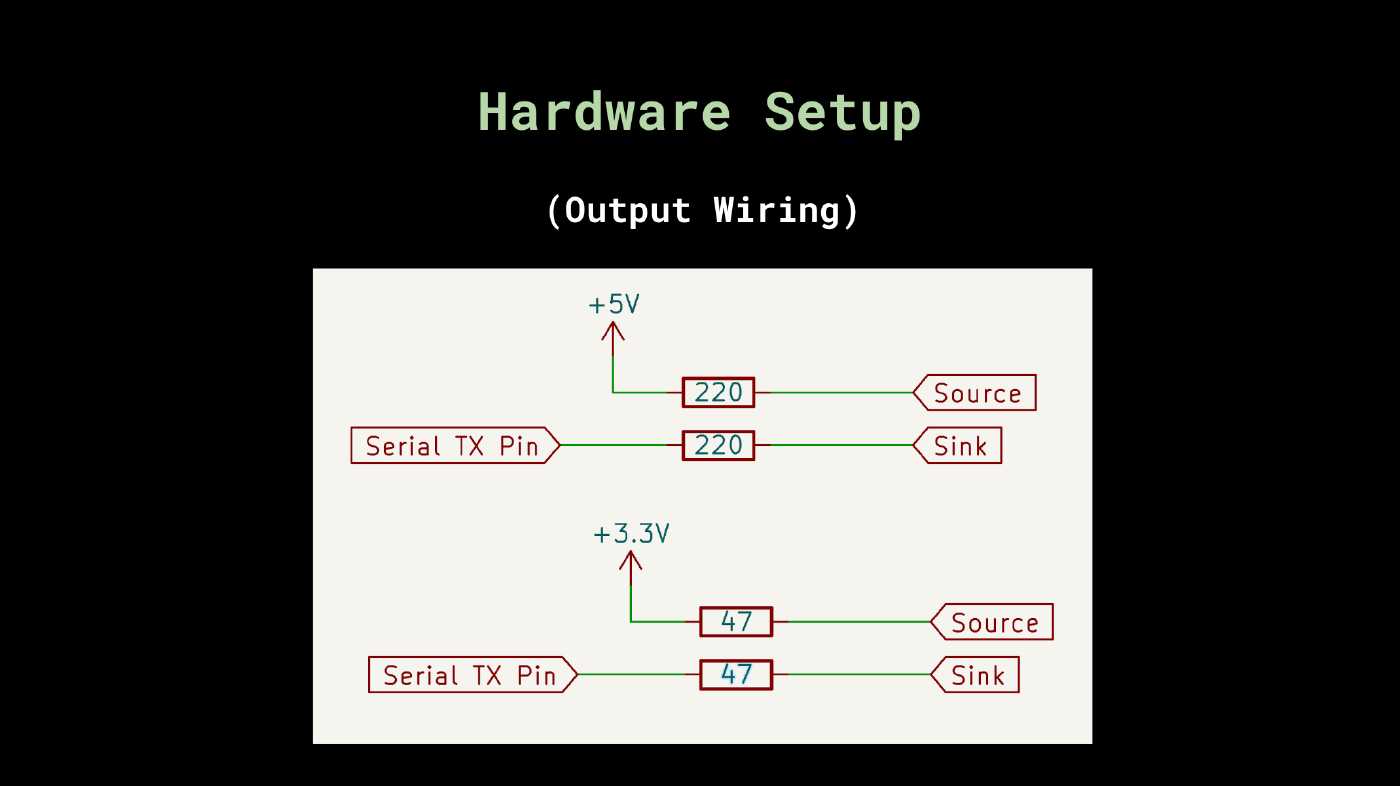
For MIDI output, connect the TX pin from the microcontroller to the sink pin through a resistor. The resistor value depends on the microcontroller’s operating voltage. A 5V microcontroller typically uses a 220ohm resistor, while a 3.3V microcontroller may use a 47ohm resistor.
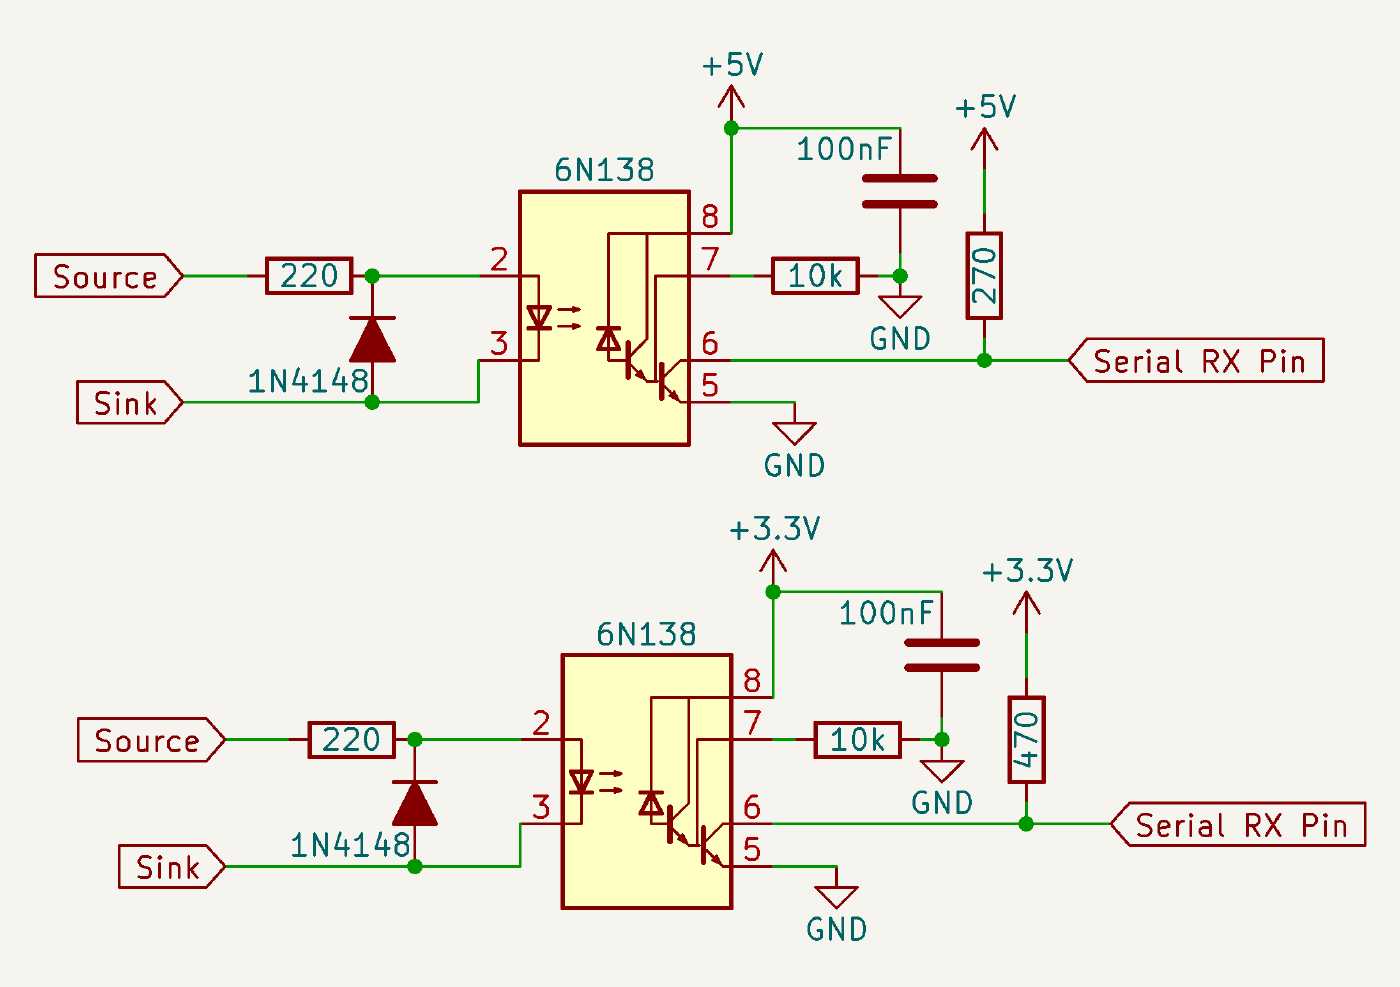
MIDI input requires an optocoupler for complete circuit decoupling. A diode is placed on the receiving side for protection against voltage spikes. The octocoupler connects to the microcontroller’s RX pin through a pull-up resistor. Common values are 270 ohms for 5V microcontrollers and 470 ohms for 3.3V microcontrollers. Adding a 10k resistor to ground at pin 7 ensures that low states are not left floating, the size of this resistor is not important but a 4.7K or 10K Ohm should do the trick.
4. Arduino MIDI Library
Installing the Arduino MIDI library with PlatformIO and a BluePill microcontroller may require manual installation from the repository. Follow these steps:
Clone the MIDI library repository into the
lib/folder.cd lib/ git clone git@github.com:FortySevenEffects/arduino_midi_library.git MIDIInitialize the MIDI instance in your sketch’s setup() function.
MIDI_CREATE_DEFAULT_INSTANCE();Begin MIDI communication in the setup() function.
MIDI.begin(MIDI_CHANNEL_OMNI);Send or receive MIDI messages in the loop() function using library functions.
// Send note 42 with velocity 127 on channel 1
 MIDI.sendNoteOn(42, 127, 1);

// Read incoming messages
MIDI.read();
6. Simple Example
This example listens for MIDI Note events and prints them to the serial monitor.
#include <MIDI.h>

// Create a MIDI object
MIDI_CREATE_DEFAULT_INSTANCE();

void setup() {
  // Initialize serial communication
  Serial.begin(9600);

  // Initialize MIDI communication
  MIDI.begin(MIDI_CHANNEL_OMNI);
}

void loop() {
  // Check for incoming MIDI messages
  if (MIDI.read()) {
    // Check if the received message is a Note On message
    if (MIDI.getType() == NoteOn) {
      // Get the note number and velocity
      byte note = MIDI.getData1();
      byte velocity = MIDI.getData2();

      // Print the received note and velocity to the serial console
      Serial.print("Note On - Note: ");
      Serial.print(note);
      Serial.print(", Velocity: ");
      Serial.println(velocity);
    }
  }
}
This example sends midi notes on channel 10.
#include <MIDI.h>

// Create a MIDI object
MIDI_CREATE_DEFAULT_INSTANCE();

void setup() {
  // Initialize MIDI communication
  MIDI.begin();

  // Set the channel to 10 (MIDI channels are 0-15)
}

void loop() {
  // Send a loop of three notes with a short pause between each note
  MIDI.sendNoteOn(60, 127, 10); // Note: C4, Velocity: 127
  delay(500);
  MIDI.sendNoteOff(60, 0, 10); // Turn off the note
  MIDI.sendNoteOn(62, 127, 10); // Note: D4, Velocity: 127
  delay(500);
  MIDI.sendNoteOff(62, 0, 10); // Turn off the note
  MIDI.sendNoteOn(64, 127, 10); // Note: E4, Velocity: 127
  delay(500);
  MIDI.sendNoteOff(64, 0, 10); // Turn off the note
  delay(1000); // Pause before repeating the loop
}
7. Conclusion
MIDI integration with microcontrollers offers vast creative potential. Incorporating MIDI into DIY projects enhances flexibility and connectivity. Stay tuned for our next video, where we’ll introduce a module incorporating MIDI functionality. Stay curious, stay creative, and don’t forget to like and subscribe! Your support encourages me to continue making videos like this one, and we appreciate it tremendously!