Mastering with Ableton Devices
Disclaimer: This device rack is by no means a replacement for commercial software written for the purpose of mastering, however, it CAN be used to achieve a much more professional sounding render of your audio if used properly. Always remember that if you start with a shitty mix, you’ll end up with a shitty master. If you need to change the character of your track, do it in the mix. The main purpose of mastering is to make your track portable and playable at its optimum playback level. Lastly, unless you know what you are doing, get it done professionally!
Ok guys, this is a quick post. I’m really sorry I don’t have the time at the moment to make a video showing you how I use this, but I’ll try to do a quick write-up. I use this strip whenever I want to do a quick master to make my tracks sound more professional when testing them in a club scenario. The idea is actually rather simple, I’ll explain below, but first let me show you around.
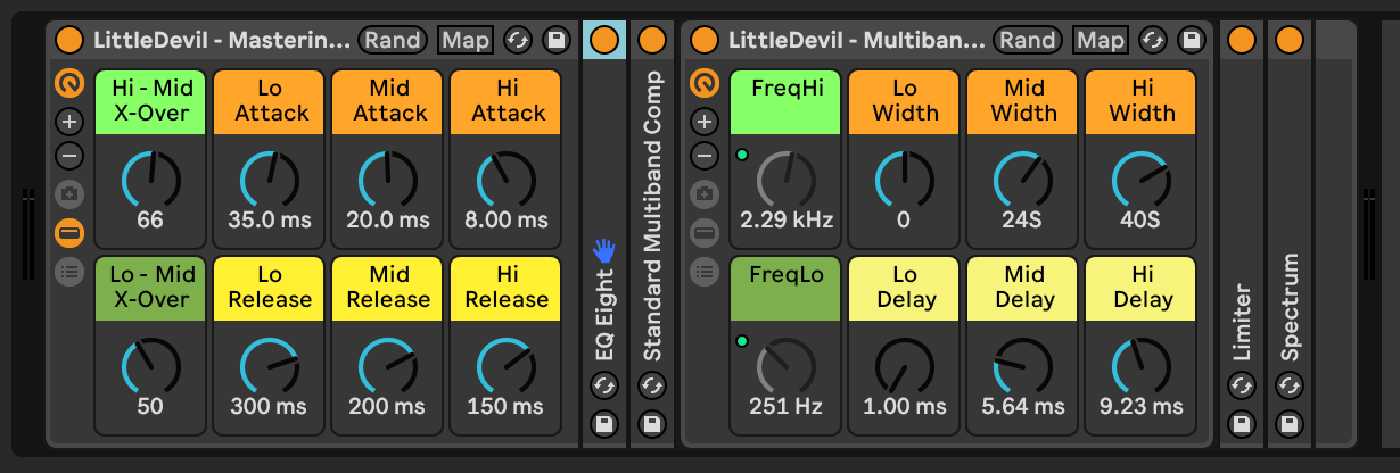
Everything I use on this rack can be found in the Ableton device browser. I’ve just mapped a couple of things here and there to add more functionality. The key thing that makes this rack important is the fact that the crossovers for the Multiband Dynamics and my custom multiband imager are mapped to two macros and thus are shared between the two devices. This allows me to use only 2 macros to keep the frequency bands synced between the compression/expansion device and my multiband imager; the rest is fairly standard mastering techniques.
When I use this, I start with everything except for the spectrum analyzer turned off. I then play the track I’m trying to master and use my ears and eyes to hear the music and get a visual representation of what I’m hearing. Remember that by the time you are at this point, your track should already be mixed the way you want it. Use this only to make minor adjustments to make the track louder.
The first thing I turn on is the EQ, and I usually do not boost, but rather I attenuate the sound to smooth things out a tad, not much. If I need to do more than a few dB adjustments, I go back to the mix.
Next, I enable the multiband dynamics, and I start lowering the threshold; the ratio on the plugin is usually about 1:4 more or less, with quicker attacks and releases on the high frequencies and just a bit more in the lower ones as you can see from the picture above. Then I compress so I get just about a 3 to 5 dB max per band. I then start tweaking the crossover until I feel that the track has a bit more oomph without killing the energy of it. You’ll know what sounds best, and it will be very subtle.
If the track needs it, I then turn on the multiband imager, and I make the lower end more mono, but just a tad – around 95%. The mid around 103% and the high around 110%. This is just enough to widen the frequencies without washing the sound out. There is just one trick with the imager that can be a little gotcha since all the bands are going through the device rack. 1ms delay actually means 0ms, this is because everything is being delayed 1ms, so don’t let that fool you. What this means is that the low is delayed 0ms while the mid and high are delayed 0.15ms. This is ever so slightly off a day. In fact, if it sounds odd, don’t even delay the mid, and if you are going to delay the mid, then make sure that the low/mid crossover is not in the bass tone range.
Lastly, I use a limiter to make things loud. You want to boost the signal until you see it engaging, maybe 2db or 3db max and this for peaks. You should barely see orange there. Use your ears; don’t let the sound change, just make it loud. Also, keep your eye on the master channel and be sure that you have about 8db to 10db of dynamic range. Set the look ahead to the highest as it will give you the smoothest results.
And that’s it really. Your track should be nice and loud now.
— Juan
PS… sorry for the bad grammar, this was supposed to be a quick post…